For example, when you navigate to Google in your web browser (via google.com), that domain is pointing you to 172.217.5.110. You instead type this IP into your browser’s address bar, and you’ll see that it brings you to Google. As you can imagine, the database that tells our machines which domain points to which IP is constantly updating and changing. The DNS resolution process, handled by your DNS server, is one of the first choke points your browser hits when returning a web page. If you’ve never changed your DNS provider or you’re currently using one provided by your ISP, it could lead to slower speeds. Even worse, especially with small-market and local ISPs, your DNS server could actually be serving ads and other content that you otherwise shouldn’t be seeing. In this article, let’s talk about how you can manually change your DNS provider and some of the more trustworthy alternatives that you can switch to.
How To Change Your DNS Server In Windows
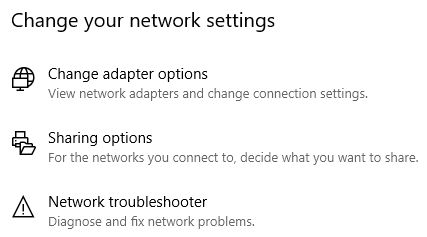
First, press the Windows + X keys and select Network Connections.On the Status page that pops up, look or scroll to the Change your network settings heading. Beneath it, click on Change adapter options.
This window that pops up should display all of your network adapters. Here, you’ll need to identify which adapter(s) you use most frequently and/or are currently connected to the internet with. If you don’t often change network adapters, the one you’re after will most likely be named Ethernet or Wi-Fi.
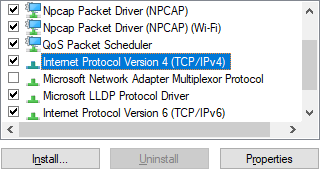
Right-click on the adapter and select Properties. The window that pops up will then show a large list of items. Find Internet Protocol Version 4 (TCP/IPv4), click on it to highlight it, then click on the Properties button below it.
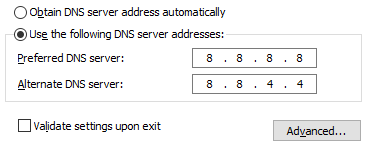
The window that pops us is where you’ll be able to change your DNS server. The bottom half of this window is what we’ll be dealing with.
By default, Obtain DNS server automatically will be the selected option. Change this to Use the following DNS server addresses by clicking on the radio button beside it.
In the above screenshot, I’ve filled in a preferred and alternate DNS server address to show how they should appear. At this point in the process, you’ll need to make the decision of what DNS server is best for you. Let’s pause here to talk about your options.
Recommended DNS Servers To Use
In 2015, Online Tech Tips published an article discussing the best free public DNS servers. While these options are still viable, a few new DNS providers have popped up since then. Let’s look into three of today’s best and most trusted options.
Google Public DNS
The benefits of using Google Public DNS include anycast routing, over-provisioning servers to protect against denial-of-service attacks, and load-balancing servers. Unlike many other DNS providers, Google Public DNS does not block or filter DNS requests unless the circumstance is considered to be extreme. Google Public DNS IPv4 addresses:
8.8.8.8 8.8.4.4
Google Public DNS IPv6 addresses:
2001:4860:4860::8888 2001:4860:4860::8844
OpenDNS
OpenDNS is a public DNS provider that has been around since 2005. One of its main draws is protection against malicious websites that may be related to phishing or malware. OpenDNS provides other content filtering options, such as FamilyShield parental controls, which can be used to block sites that contain pornography. OpenDNS IPv4 addresses:
208.67.222.222 208.67.220.220
OpenDNS IPv6 addresses:
2620:119:35::35 2620:119:53::53
Cloudflare DNS
Cloudflare has been known for years due to its CDN and DDoS mitigation services. In April 2018, Cloudflare announced that it had acquired the prestigious 1.1.1.1 address and would begin using it for its public DNS service. It’s advertised as the “fastest, privacy-first consumer DNS service,” claiming to process queries over twice as quickly as Google Public DNS. Cloudflare IPv4 addresses:
1.1.1.1 1.0.0.1
Cloudflare IPv6 addresses:
2606:4700:4700::1111 2606:4700:4700::1001
These are the three most trustworthy DNS provider options. While many may make claims regarding speed and performance, this will vary across locations. I’d highly recommend that you try each of them and see if you can notice any differences. If you’d like to look into an automated way of determining which DNS provider is fastest for your connection, Help Desk Geek previously published an article on utilities for changing your DNS servers.
Set & Validate Your DNS Server
Once you’ve decided on a DNS provider, input the preferred and alternate addresses in the window previously opened. Be sure to also tick the checkbox beside the Validate settings on exit option so that Windows runs a quick check to ensure that your DNS servers are working properly. When finished, I recommend checking out the What’s My DNS Server? website to do a second check. If everything looks good, congratulations! Remember, it’s a good practice to try out several different DNS providers – performance differs based on many factors, and this is the only real way to determine which is best for your circumstance.


